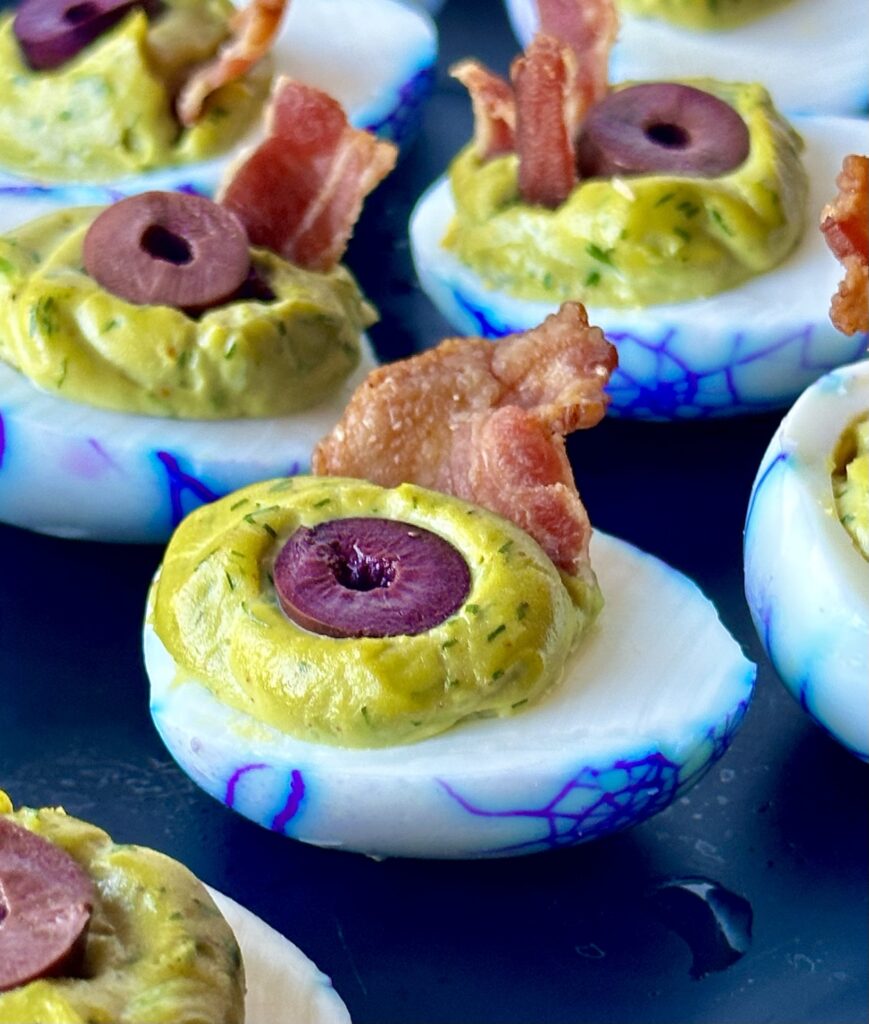
The Original Viral Zombie Eyeball Deviled Eggs (Easy Halloween Appetizer)
Welcome to the official home of the original viral Halloween eggs seen on @baconandspice reels! As a classically trained chef, I designed this foolproof recipe to be the ultimate easy Halloween appetizer for holiday parties- combing show-stopping visual appeal with perfectly balanced flavors. This isn’t just about looks; the filling is packed with fresh herbs, tangy pickle juice, and rich egg yolks, all topped with a briny olive and crispy bacon for the perfect smoky crunch! Whether you keep them whole to display as creepy Spiderweb Eggs or slice them open for veiny Zombie Eyeball Deviled Eggs. This official step-by-step recipe took social media by storm—accumulating more than 75 MILLION views and more than 15 years of watch time across viral videos 🤯
Don’t fall for the low-quality copycats or stolen versions floating around the internet; get the authentic, foolproof, chef-tested method right here! Scroll down to see my real step-by-step process photos (complete with real messy eggshells!) and my essential kitchen tips on exactly which food coloring to use to get those razor-sharp, vibrant purple lines every single time.
Want to see this recipe in action?? Watch the original viral video pinned at the top of my Instagram reels tab @baconandspice to see the step by step egg cracking & techniques. It’s also on my Facebook and Tiktok under the same name.
👨🍳Chef’s Note: Just a reminder that these will turn out best if soaked OVERNIGHT so they need to be dyed the day before you need them.
How to Get the Perfect Halloween Spiderweb Pattern (Step-by-Step)
Making these purple eerie eggs is a two-day process, but it is incredibly easy if you follow the right technique. The secret lies in creating the perfect spiderweb fractures on the eggshells before they go into the dye bath, as well as being highly intentional about the specific type of dye you choose for the staining process.
👨🍳 Chef’s Note: Real Food, Artificial Dye, & The Visual Difference
If you follow my kitchen journeys, you know I am an advocate for real, whole foods and cleaner cooking. I try to avoid processed food where I can, so using artificial dye for these purple veins might surprise you! I extensively tested this version with MANY versions of plant-based natural purple dyes (also cabbage, red onion skins, beets etc.) but they simply cannot absorb deeply enough overnight to stabilize those crisp, razor-sharp hairline fractures. The good news is that the artificial dye is purely structural—it clings only to the very surface of the cracks and doesn’t soak through the meat of the egg. It’s a tiny amount used once a year for holiday design magic!
However, if you are strictly dye-free, you can see how I use 100% natural colors in my other recipe: the Jalapeño Popper Spooky Eyes. For that version, I use a plant-based red dye for the veins and a pitch-black filling made from real squid ink and activated charcoal powder. As you can see in the small photo below, because natural plant-based dyes lack the aggressive synthetic binding agents found in artificial gels, the red veins bleed slightly into the egg white. While they don’t look as razor-sharp as our purple spiderweb lines, that softer bleeding effect actually makes them look like incredibly realistic, creepy, bloodshot zombie eyeballs!
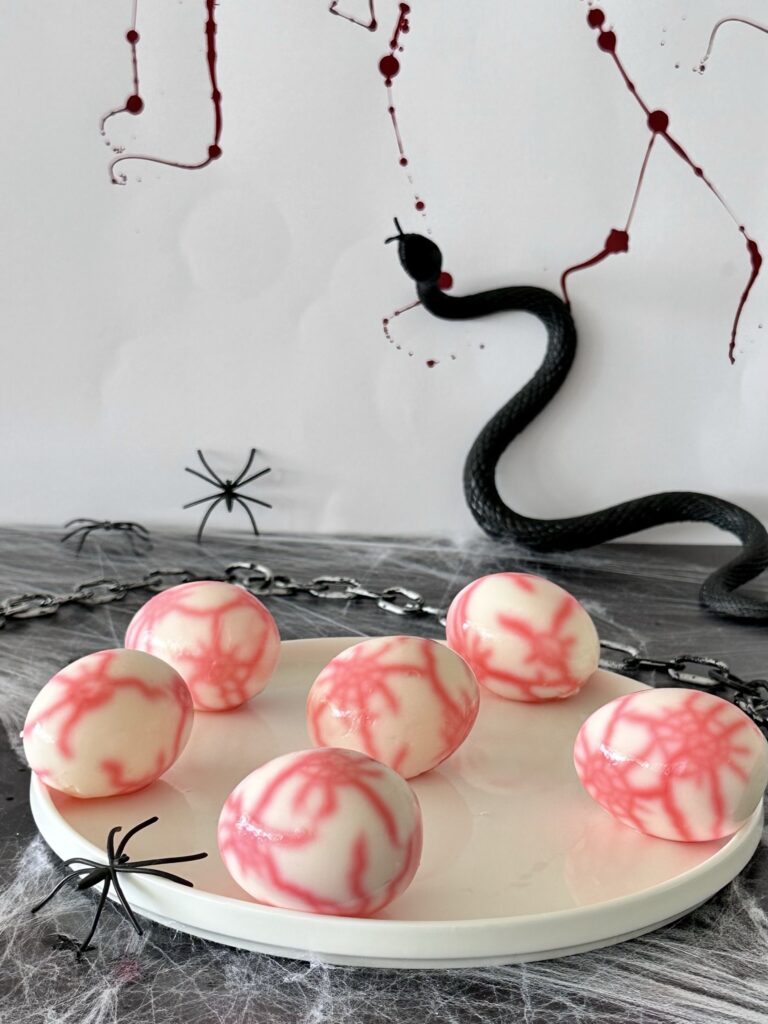
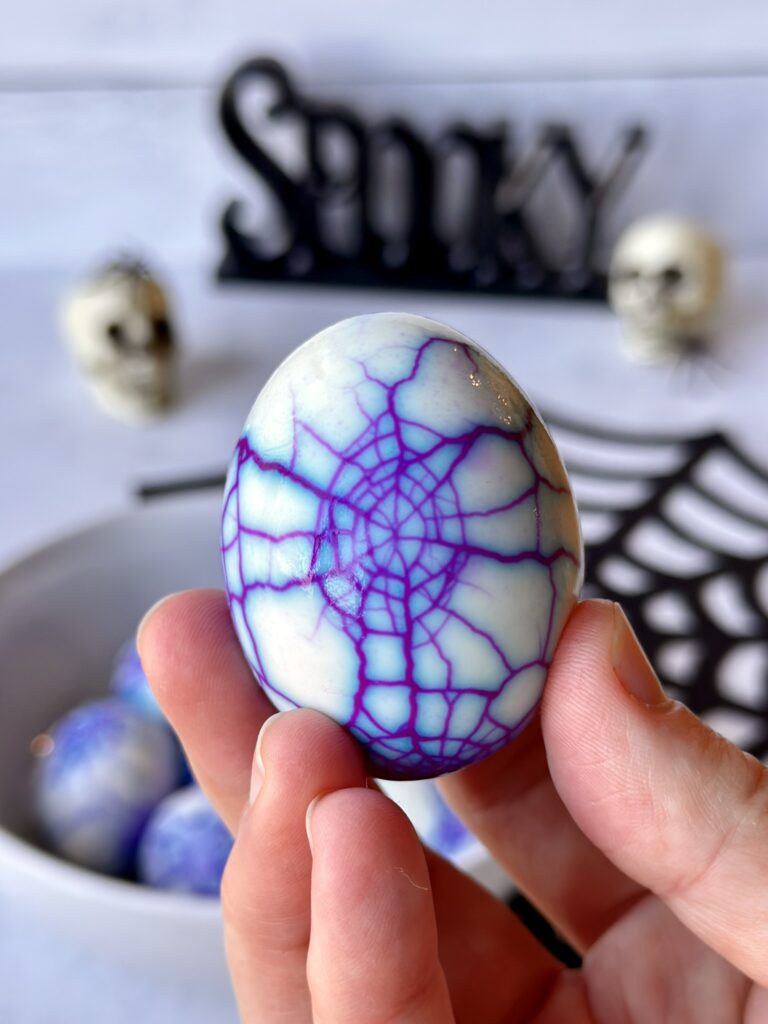
Step-by-Step Shell Fracturing & Dye Mixing Technique
First, let’s talk about the shell fracturing. To get that flawless, eerie purple spiderweb effect without accidental color bleeding, there is a very specific technique you need to follow. When you are tapping the hardboiled eggs with the back of a soup spoon, make sure to leave noticeable space between each tap. If your cracks cluster too closely together, the fragile fractures will completely merge into one giant cavity. This completely ruins the crisp hairline “spiderweb” look and leaves you with an unappealing, muddy block of color instead. You also want to strictly avoid tapping the very top or the flat bottom ends of the egg. The natural air cell pocket sits right beneath those zones, and fracturing them forces a massive rush of dye underneath the membrane all at once, which causes major structural bleeding that ends up looking blotchy.
The order of operations in your kitchen matters just as much as the cracking. Always place your fractured eggs cleanly inside your glass bowl first, and pour your cold water in second until they are completely covered (I used a medium sized Pyrex bowl and it was 3/4 full so approximately 4 to 5 cups or 1 liter). For the dye itself, you want to mix your red liquid food dye and blue liquid food dye together in a separate little dish first to create a beautiful, uniform purple before adding it to the bowl. Never pour concentrated liquid dye straight onto dry eggshells, as a single egg will absorb the raw pigment instantly, throwing off the entire concentration balance for the rest of the batch. By mixing the red and blue together in a dish first and adding it to the water last, you ensure a flawless, even distribution.
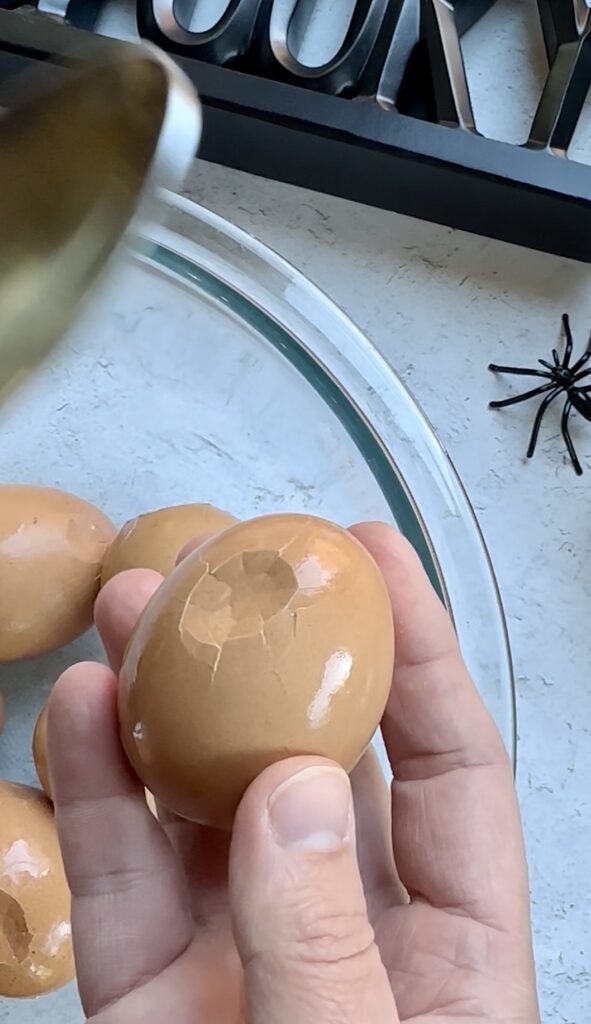
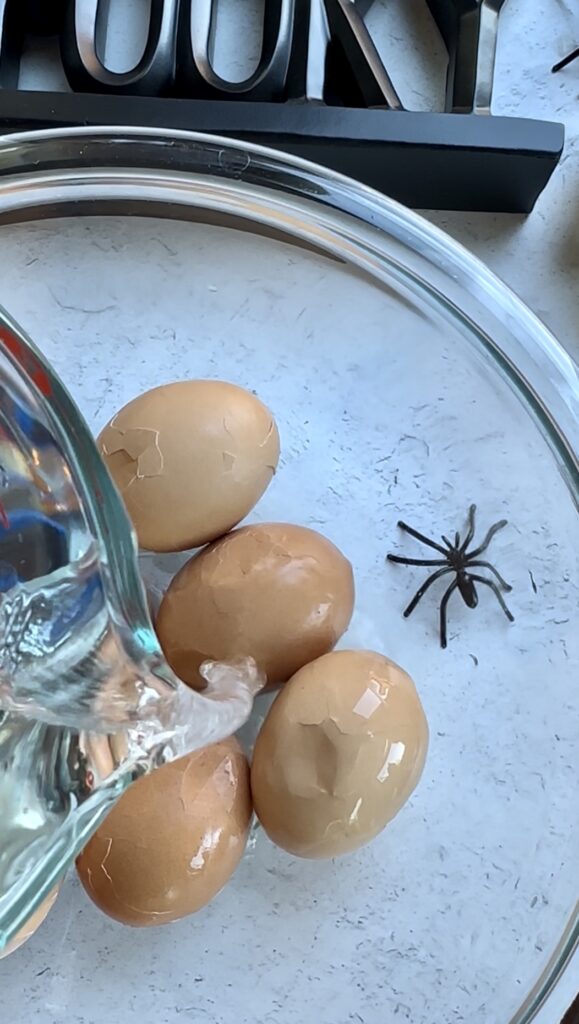
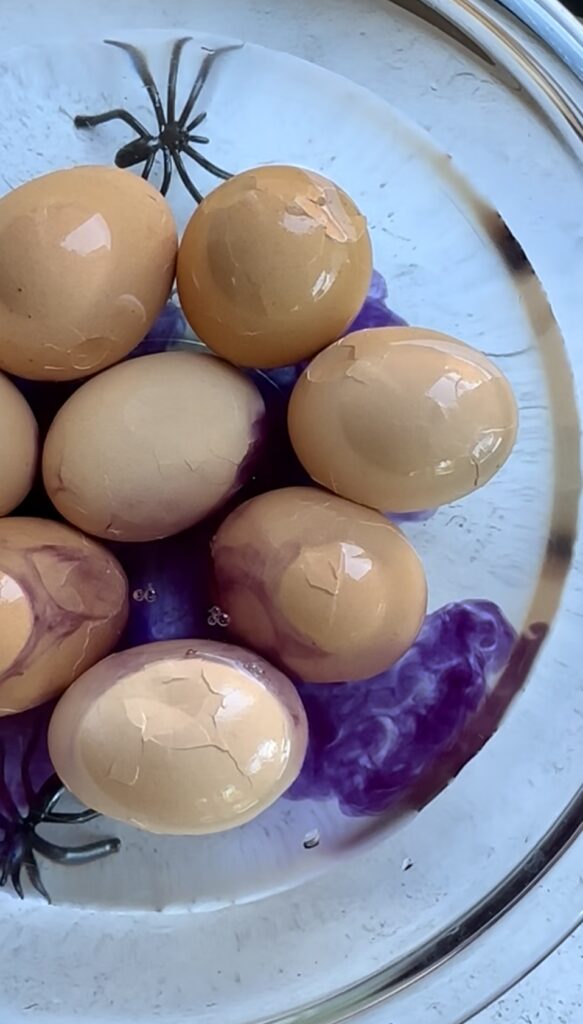
Depending on the size of the squeeze bottles you have on hand, here are the exact chef measurements to use for this formula. If you are using the classic, larger grocery store bottles like the old McCormick or packs, use 0.25 fluid ounces of red and 0.25 fluid ounces of blue, which is exactly half a bottle or roughly one and a half teaspoons of each color. If you are using the newer, smaller multi-pack squeeze bottles, use 0.15 fluid ounces of red and 0.15 fluid ounces of blue, which is half of the smaller bottle or roughly one teaspoon of each.
Day 2: The Chef’s Peek Test & Flawless Peeling Technique
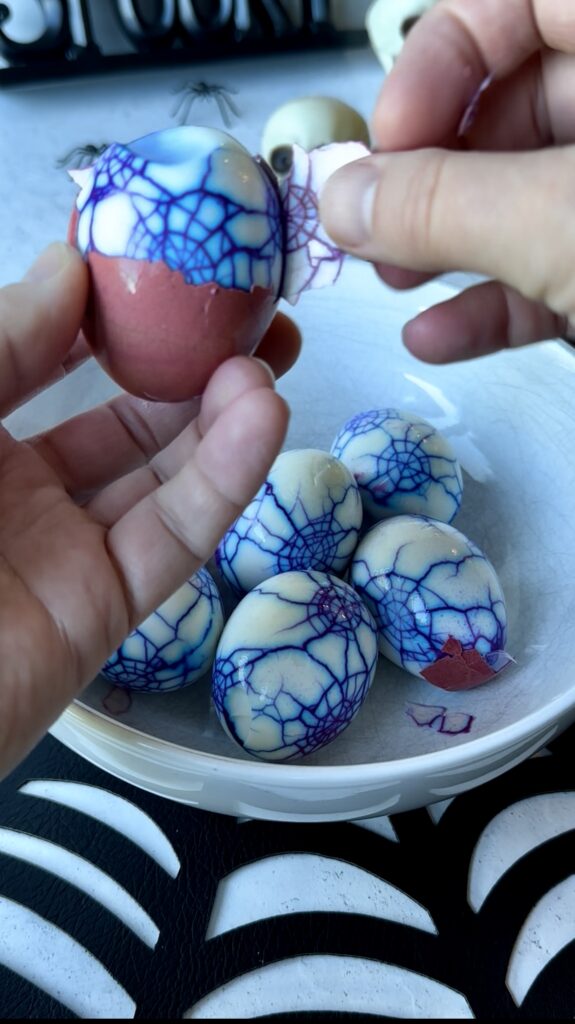
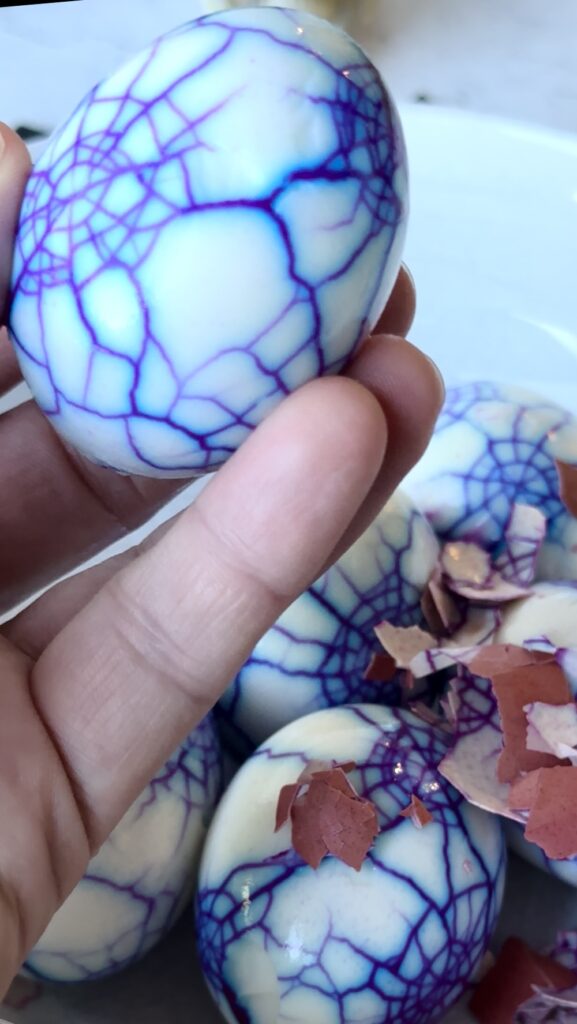
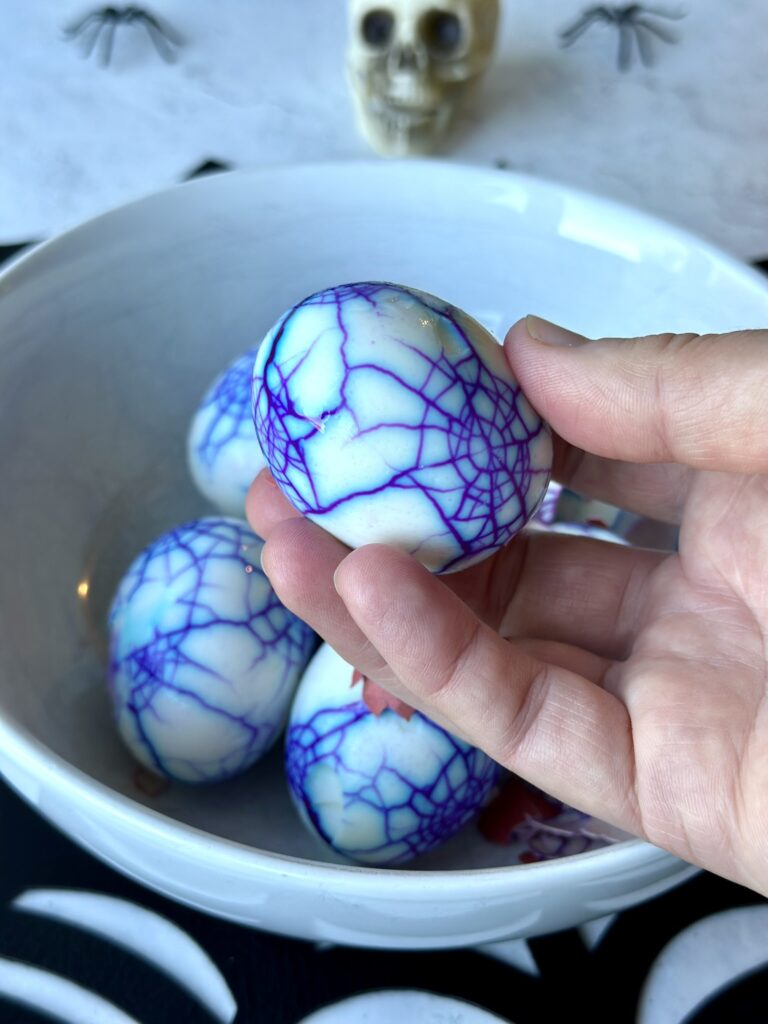
While I highly recommend letting your eggs sit in the purple bath completely overnight for maximum fluorescent saturation, you don’t have to fly blind! Some commenters on my viral TikTok and Instagram videos claimed these flawless spiderweb lines weren’t real just because their own attempts turned out blotchy. If you follow my Chef’s tips you will also get these perfect eggs! To guarantee success and stop the doubters, you can easily test your progress after about 8 to 10 hours using my “Chef’s Peek Test.” To do this, gently pick up one egg from the dye bath, crack open a tiny fragment on one side, and carefully peel back a small sliver of the shell just like you see in the first photo below. This lets you peek at the vividness of the purple veins underneath without ruining the presentation. If the hairline cracks look bold and sharp, you are good to pull them!
👨🍳 Chef’s Note: To save you time and frustration: always peel these under cool running water. The water pressure slips right between the membrane and the egg white, causing the shell to slide off effortlessly without tearing your beautiful spiderweb design. If your peek test looks a little faint, just pop them back into the purple bath for a few more hours to finish staining!
How To Make the Herbaceous Green Goddess Filling & Assemble the Zombie Eyes
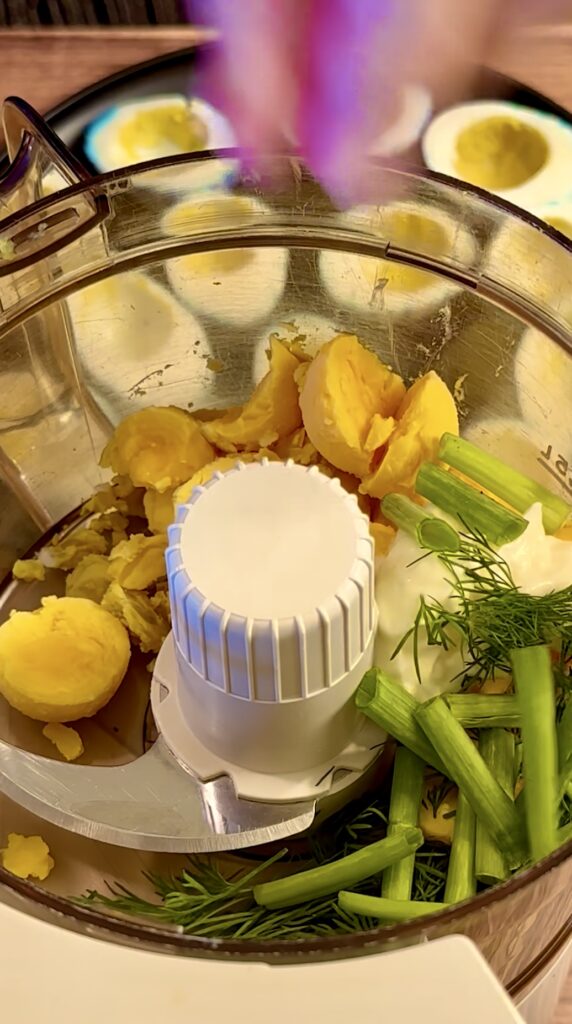
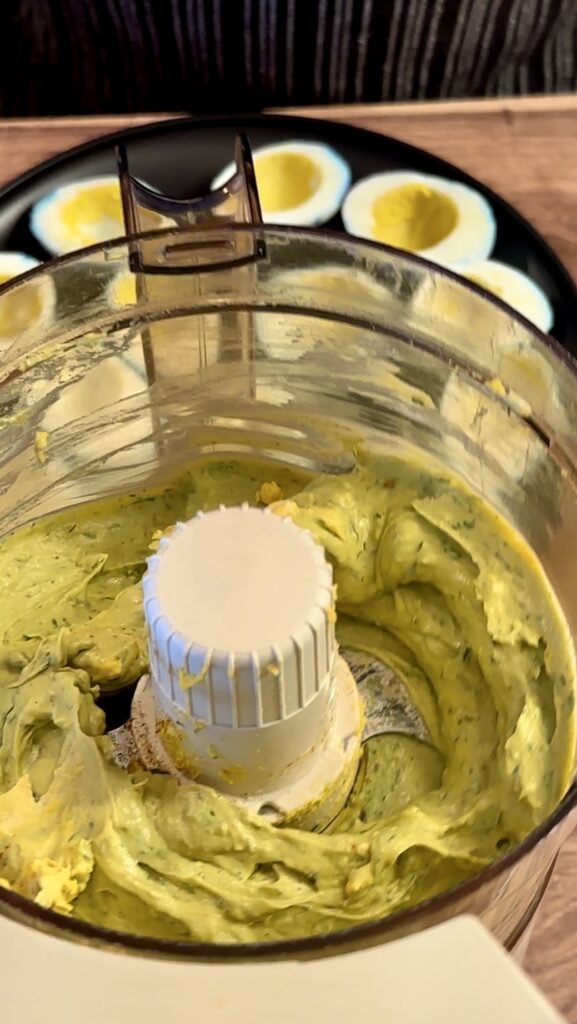
To get a restaurant-quality, silky-smooth emulsion that won’t clog your piping bag, you must use a food processor to cleanly break down the fibrous fresh dill and green onions. Place your cooked egg yolks into the processor bowl along with the mayonnaise, Dijon mustard, a splash of pickle juice, and actual round dill pickle slices—which is my secret trick for an incredible texture and a clean, bright pickle punch. Blending in the fresh green onion stems and chopped dill creates a gorgeous, fragrant, and deeply herbaceous filling that tastes wonderfully fresh. Blend until completely smooth, and if you want to elevate that electric, eye-catching Halloween look, this is the perfect time to add a few drops of natural, plant-based green food coloring to enhance the color and really make it pop on your party table! Once your ingredients are loaded up, use the food processor to pulse and blend the mixture. Once blended, spoon your silky mixture into a piping bag or food safe plastic bag (placing the piping bag into a Pyrex measuring cup or mug helps to hold it in place as you spoon the mix in!). Twist the top of the piping bag securely to remove any air and you are ready to pipe! (if you are using a food safe Ziploc style baggie instead of a piping bag please see chef’s tips below next photos)
👨🍳Chef’s Note: Be sure to stop the machine partway through blending and use a rubber spatula to cleanly scrape down the sides of the bowl. This guarantees that every single piece of fresh herb and egg yolk is perfectly pulled into the vortex so everything combines into a completely smooth, silky, and naturally vibrant green emulsion.
👨🍳 Chef’s Assembly Tips & Time-Saving Hacks:
- The “Lazy” Shell Shortcut: When scooping out your hard-boiled yolks, do not waste your time meticulously scraping or wiping the inside of those purple egg halves completely clean! Because we are blending mayonnaise, mustard, and pickle juice into the yolks, the overall volume of our filling expands way past the original capacity of the egg. When you pipe that generous mixture back in, it will easily overfill the cavity and naturally mask any tiny leftover crumbs or imperfections. Skip the extra scrubbing and save your time!
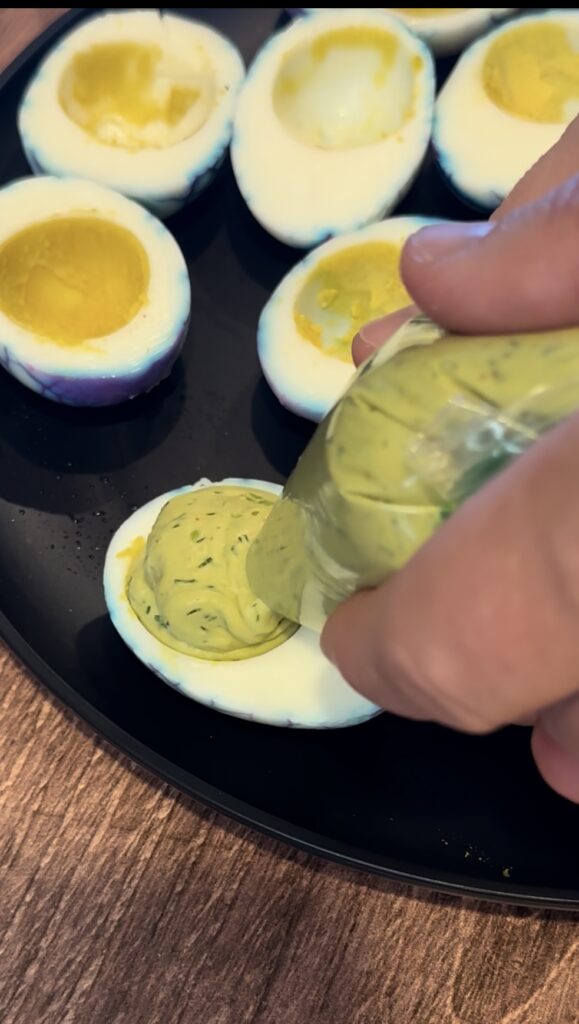
- The Plastic Ziploc Piping Bag Hack: If you do not own a professional pastry piping bag, a standard plastic sandwich bag or Ziploc baggie is a flawless kitchen shortcut. Simply spoon your smooth herb filling neatly into one bottom corner of the plastic bag. Squeeze the mixture down, twist the wide open top of the bag securely to build up clean pressure, and use a pair of kitchen shears to snip a small hole off the very bottom tip. Gently squeeze from the twisted top to pipe a beautiful, clean mound of the green goddess mixture straight into the center of each purple-veined egg half.
👨🍳 Chef’s Note: The Great Olive Controversy, Assembly & Plating Tips
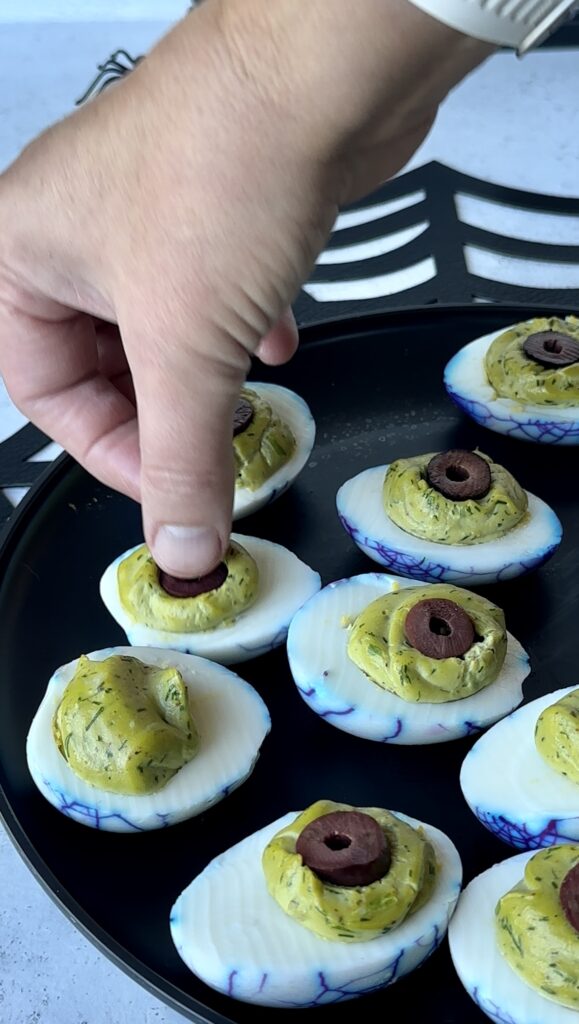
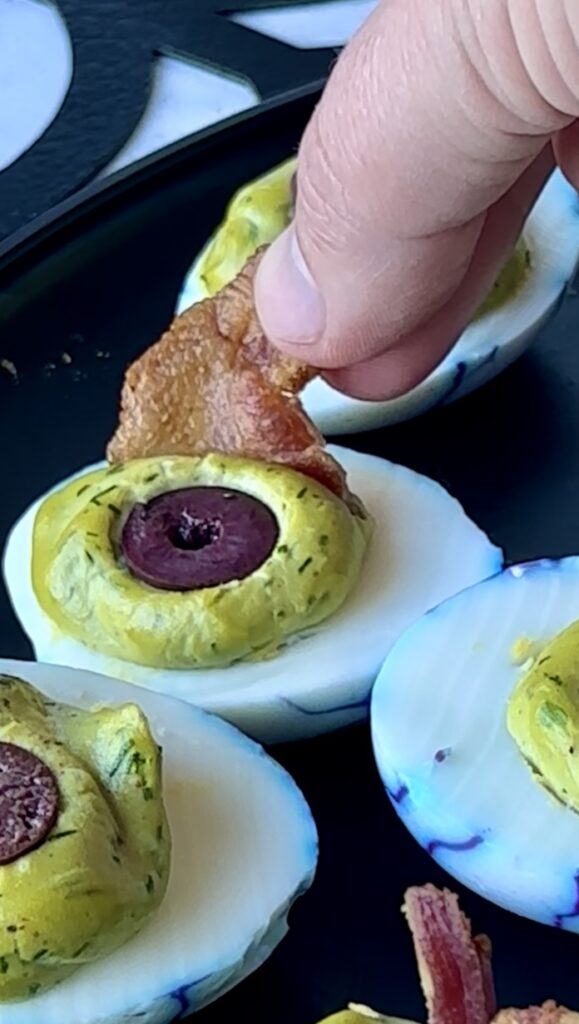
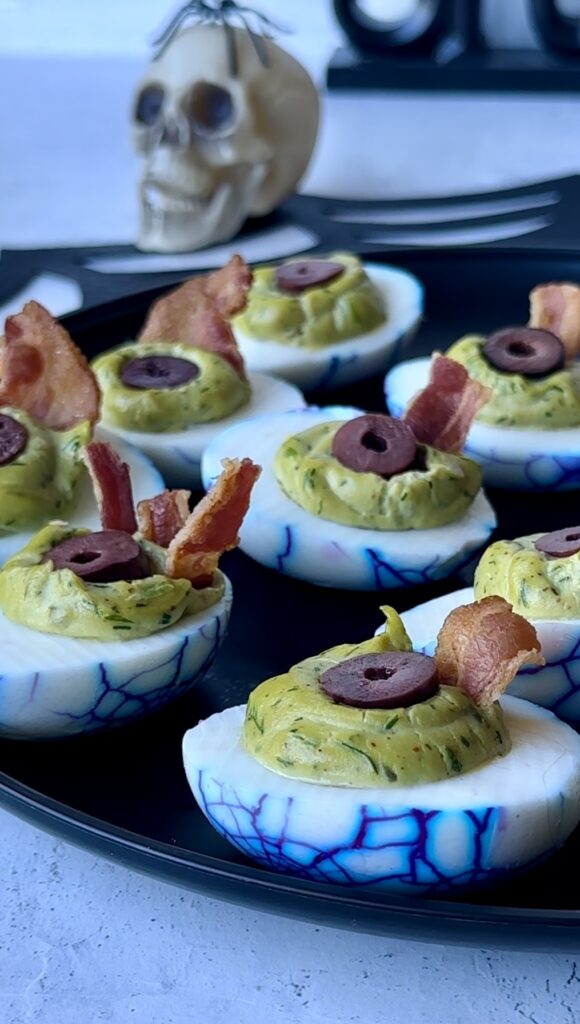
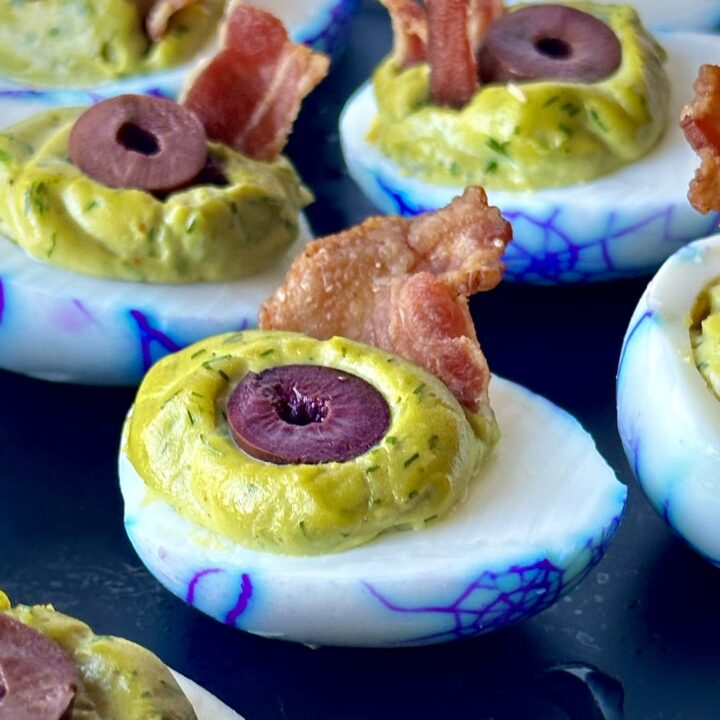
When one of my original reels for this recipe went mega-viral—raking in over 66 million views—a massive, hilarious war broke out in my comment section. People started fiercely debating whether or not olives belong on deviled eggs! It honestly reminded me of the classic debate over whether pineapple belongs on a pizza-some people love it (I do!), and some people absolutely hate it. It really comes down to personal flavor preference. Back to olives…. I love how the briny, salty bite of a sliced black olive & the splash of pickle juice cuts through the rich egg yolk & mayo filling. Plus, placing that olive slice right in the dead-center of your piped filling creates the ultimate creepy zombie pupil effect, finished with a crisp shard of bacon for a texture-packed eyelid!
The Olive Hater Back-Up Plan: If you strictly despise olives, don’t panic. You can easily swap the olive slice for a round slice of pickled jalapeño, a small wheel of cherry tomato, or a tiny ring of a sweet pepper to keep that spooky “pupil” look alive.
My Personal Plating Hack: To make these colors absolutely explode, I always love to serve my finished masterpiece on a matte black plate or platter. These can be tricky to find but you can often find plastic ones in the outdoor section of a local store. Hard-boiled egg appetizers are always best enjoyed when they stay completely chilled and fresh, I use a quick trick whenever I serve them at my own gatherings: I take a rimmed serving tray or plate with an edge, spread a layer of crushed ice across it, and nestle my black serving plate directly on top of the ice. I also make sure to space the eggs out cleanly so they aren’t touching, which makes it much cleaner for guests to grab one. It keeps my terrifying creation looking—and tasting—flawless while it’s being served!
~Chef Jen ❤️
If you make these spooky eggs be sure to snap a picture and tag me on Instagram, Facebook or TikTok @baconandspice ! I woudl love to share your kitchen masterpieces in my stories. Don’t forget to check out my other viral Halloween recipe reels for food inspiration!
The Original Viral Zombie Eyeball Deviled Eggs (Spooky Spiderweb Eggs)
The original viral purple spiderweb eggs with a deeply herbaceous, vibrant green goddess style egg yolk filling! This stunningly creepy, easy Halloween appetizer is bright & flavorful, and guaranteed to be the ultimate showstopper at your party.
Ingredients
- 7 large eggs
- 4 to 5 cups cold water
- 1 pack liquid artificial purple food coloring (or 1 tsp red and 1 tsp blue liquid food dye mixed together; natural versions do not work!)
- 3 Tbsp mayonnaise
- 1 Tbsp Dijon mustard
- 1 tsp dill pickle juice
- 2 Tbsp fresh dill, finely chopped
- 3 green onion stems (green parts only, finely chopped)
- 1/4 tsp cayenne pepper (optional)
- A pinch of salt and black pepper (to taste)
- A few drops of natural green food coloring (to make the color vibrant green)
- 1 strip crispy bacon, broken into small shards (optional garnish for zombie eyeballs)
- 4 to 5 pitted black olives, sliced into rings (optional garnish for zombie eyeballs)
Instructions
- Place eggs in a pot with cold water and bring to a rolling boil. Immediately remove the pot from the heat and cover with a lid for exactly 9 minutes. Once the timer goes off, place the eggs into ice water until completely cool.
- Once cooled, use the back of a spoon to gently tap fine spiderweb cracks spread out around the eggshells. Avoid tapping the very top or flat bottom ends of the eggs to prevent blotchy color bleeding.
- Place the fractured eggs in a glass mixing bowl and fill with 4 to 5 cups of cold water until they are covered. Add your artificial purple food coloring (or mix your red and blue liquid dyes together in a separate small dish first to guarantee an intense, uniform purple hue). Cover with a lid or plastic wrap and refrigerate OVERNIGHT.
- Carefully peel the eggs under cool running water to let the shell slide off effortlessly. Slice the eggs lengthwise so your coolest spiderweb patterns show clearly on the sides, and pop the yellow yolks straight into your food processor bowl.
- Place the egg yolks in a food processor and add the mayo, Dijon mustard, pickle juice, chopped dill, green onions, and optional cayenne pepper. Pulse and blend until the mixture is completely smooth and velvety. Season with salt and pepper to taste, and blend in a few drops of your green food coloring to make the color extra vibrant green!
- Spoon the silky mixture into a pastry piping bag or a food-safe plastic Ziploc baggie (placing the bag inside a Pyrex measuring cup or mug helps hold it open without a mess!). Twist the top securely to remove air and build pressure, snip a tiny corner off the bottom tip, and neatly pipe the green mixture into your empty egg halves. Top with black olive slices for a zombie pupil and a crisp shard of bacon on the side for an eyelid if you want to make zombie eyeballs, otherwise leave them as creepy spiderwebbed eggs. Enjoy cold!
Notes
Plating Tip: To make these colors pop, I love to serve my finished eggs on a matte black plate or platter. Hard-boiled egg appetizers are always best enjoyed when they stay completely chilled and fresh, so whenever I serve them at my own gatherings I like to nestle my serving plate directly on top of a rimmed tray (or plate with edges) filled with crushed ice to keep things cold!
Nutrition Information:
Yield: 14 Serving Size: 1Amount Per Serving: Calories: 76Total Fat: 5g
Nutritional values provided are automated estimations only and can vary based on portion precision, preparation techniques, ingredient freshness, and specific commercial brands used. This recipe is intended for informational and entertainment purposes only. I am a home cook and culinary graduate sharing my personal recipes, not a registered dietitian or certified nutritionist, and this information should not be taken as professional medical or health advice.